Release of Information
The original HIPAA privacy rule (and state law) require you to obtain express written consent to share PHI (Protected Health Information) except for the following exceptions: to provide treatment, to request payment, and for healthcare operations (e.g. scheduling a surgery).
In addition, it requires you to keep a log of the information you released, the date it was released and to whom it was released. patientNOW keeps the log for you when you use the Release of Information functionality.
To begin, you must select the documents to release and then select the method to send them.
Select the Documents to Release
Print Envelope to Mail Documents
Select the Documents to Release
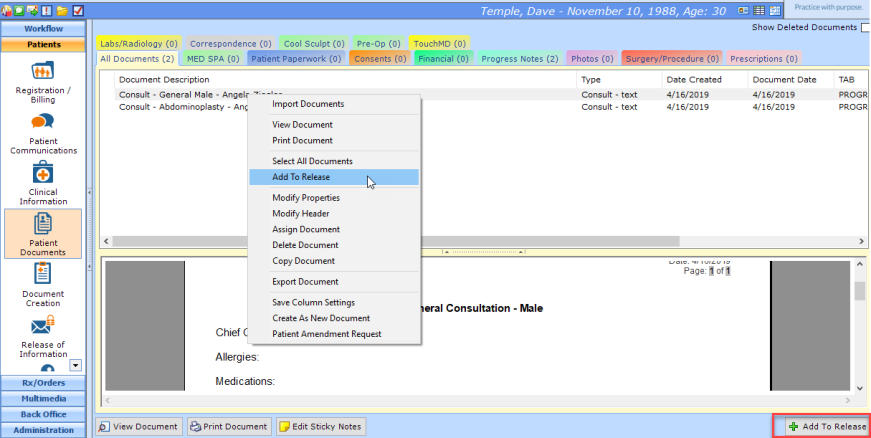
Select patient and navigate to Patients | Patient Documents.
Left click on the document to highlight.
Right-click and select Add to Release (or select Add to Release in lower right corner).
Note: you will not receive a message after each document is added.
Repeat for each document to include in the release.
To remove document(s) from the release if they were added in error, highlight the document to remove and select Remove from Release in the lower right corner. If you wish to remove all of the documents from the release, select Remove All. Note: removing documents does not remove them from Patients | Patient Documents; they are just removed from the Release of Information section.
Confirm that the documents you selected are showing. You may select View Document to confirm the contents of the selected document.
Select Print Documents.
Select Sender and Recipient. For additional information, check out Select Sender and Recipient
The windows print dialog will appear. Confirm printer information and select OK.
Confirm that the documents you selected are showing. You may select View Document to confirm the contents of the selected document.
Select Print Envelope.
Select Sender and Recipient. For additional information, check out Select Sender and Recipient
The Print Envelope dialog will appear.
The Include Return Address box defaults to unchecked because many practices have preprinted stationary. If you check the box, you must also select a Facility to use for the return address.
Confirm Printer Settings and select OK.
Note: The total size of faxed documents must be 10 MB or less. patientNOW may need to split the documents into multiple faxes if the combined size is over the limit.
Confirm that the documents you selected are showing. You may select View Document to confirm the contents of the selected document.
Select Fax Documents.
Select Sender and Recipient. For additional information, check out Select Sender and Recipient
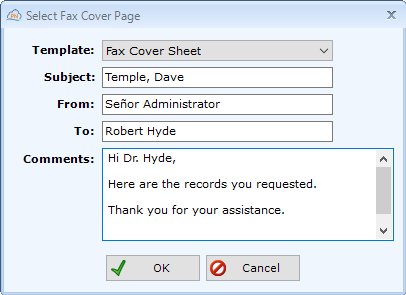
The Select Fax Cover Page dialog will appear.
- Template. Displays document templates from Administration | Document Templates, Fax Cover Sheet tab.
- Subject: Defaults to patient name, but you may change it.
- From. Defaults to the name of the logged in user.
- To: Defaults to Recipient Info Name.
- Comments. Type a personal message here.
Select OK.
Note: Use to send email to a recipient who is NOT the patient. Use Email to Patient if sending directly to patient.
Confirm that the documents you selected are showing. You may select View Document to confirm the contents of the selected document.
Select Email Documents.
Select Sender and Recipient. For additional information, check out Select Sender and Recipient
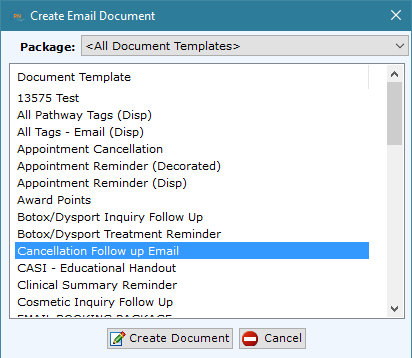
Select the Email template to send. The list displays all of the active Templates in Administration | Document Templates, Email Templates tab. The documents will be sent as an attachment.
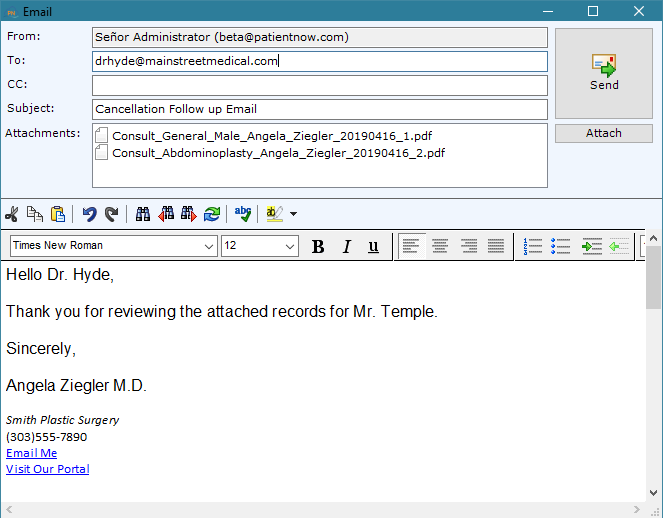
The Email dialog will appear using the Email Template you selected above. You may edit any of the recipients, attach additional documents, or edit the email contents. Then select Send.
Note: The process for this is the same as Email Documents, you just do not have to Select Sender and Recipient.
Confirm that the documents you selected are showing. You may select View Document to confirm the contents of the selected document.
Select Email To Patient.
The Create Email Document dialog will appear. The list displays all of the active Templates in Administration | Document Templates, Email Templates tab.
The Email dialog will appear using the Email Template you selected above. You may edit any of the recipients, attach additional documents, or edit the email contents. Then select Send.